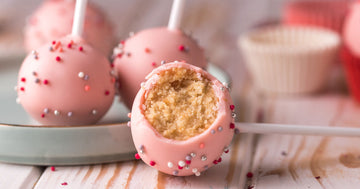
Cake pops have risen to fame for their bite-sized appeal, vibrant design capabilities, and their ability to make any occasion just a little bit sweeter. Whether you make them for a birthday party, a wedding, or simply as an excuse to indulge, these tiny treats offer creativity without the mess of more traditional dessert options. But as deceptively simple as they look, making cake pops can often turn into a frustrating battle of crumbs, uneven shapes, and failed attempts that ruin your hard work.
That doesn’t mean you should give up, though. Like any baked treat, cake pops take time to perfect. With the right tools, techniques, and a little patience, you can master the art of the cake pop and create a perfect treat for any occasion. Improve your baking skills with these tips for making perfectly shaped cake pops every time.
The Essential Tools and Ingredients You Need for Success
Before diving into the process of making cake pops, having the right tools and ingredients on hand is crucial. Start with a high-quality cake mix or a homemade recipe you trust to provide a soft yet dense cake consistency. The density matters because it will affect how well your crumbled cake holds together later. You can also use a cake pop baking kit to craft the perfect cake with ease.
For tools, ensure you have a large mixing bowl, a small cookie or ice cream scoop for evenly portioned cake pops, lollipop sticks that are sturdy enough to hold the pops, and a baking sheet lined with parchment paper. For decoration, you’ll need high-quality melting chocolate, candy melts, or couverture chocolate, along with sprinkles, edible glitter, or other add-ons of choice.
How to Bake, Crumble, and Mix the Cake Pops Base
The foundation of great cake pops starts with your base: the cake itself. Bake your cake per the recipe or box instructions. Once cooled, crumble the cake into fine crumbs using your hands. Alternatively, you can use a mixer or a food processor for a finer, more consistent crumb texture.
Mix in small amounts of frosting gradually, starting with one to two tablespoons at a time. The goal is to create a pliable dough-like consistency. Avoid overmixing or adding too much frosting, as this can make the batter too mushy and difficult to shape.
Shaping Cake Pops into Perfectly Even Designs
One of the best tips for making perfectly shaped cake pops every time is to use a small cookie or ice cream scoop to portion out equal amounts of cake mixture. This not only ensures consistent sizing but also makes the rolling process quicker and easier. Once portioned, roll each scoop between your palms until smooth and as even as possible.
After rolling, place the cake balls onto a parchment-lined baking sheet. Allow them to chill in the refrigerator for at least half an hour. This step is essential, as it firms up the cake balls for easier handling and ensures they won’t fall apart when you insert the lollipop sticks or dip them in chocolate.
When inserting the sticks, dip the tip of each stick into melted chocolate before gently pressing it into the center of the chilled cake ball. The melted chocolate acts as a kind of “glue” to hold the stick in place once it sets. Return the cake pops to the fridge for another few minutes so the chocolate can harden. This will help the sticks stay in place as you dip and decorate.
The Best Chocolate for Dipping and Proper Coating Techniques

Choosing the right chocolate will make all the difference in how your cake pops look and taste. High-quality melting chocolate or candy melts are recommended for their smooth consistency, fast setting time, and vibrant color options.
To melt your chocolate evenly, use the double boiler method or microwave it in short intervals, stirring often to prevent burning. Once melted, stir it thoroughly to eliminate any air bubbles. Don’t worry about rushing through the dipping process before your coating cools. Keep re-heating as you go so you can keep your chocolate smooth without feeling rushed.
Dipping Tips for a Flawless Finish
Achieving a smooth, polished finish on your cake pops can take a little practice. To coat the cake pops evenly, hold the stick and dip the entire cake ball into the chocolate, ensuring it’s fully submerged. Use a gentle twisting motion to help the chocolate adhere to the surface. After lifting the cake pop out of the chocolate, gently tap the stick against the side of the bowl to remove excess coating. Work quickly but carefully to avoid the chocolate setting before you’ve removed extra drips.
If your chocolate coating appears too thick or clumpy, it might be too cool. Warm it up slightly to regain the right consistency. On the other hand, if your cake pops are falling apart during the dipping process, they haven’t been chilled long enough, or your mixture was too soft to begin with.
For decoration, sprinkle your chosen toppings immediately after dipping while the chocolate is still wet. This ensures that everything adheres properly. Work on one cake pop at a time to avoid the chocolate setting before you can decorate.
Storing Cake Pops to Maintain Their Shape and Freshness
Once you dip and decorate your cake pops, storing them properly will ensure they stay delicious and maintain their perfect shape. Allow the chocolate coating to set completely before attempting to move or package them. If storing for an event, you can keep your cake pops upright by placing their sticks in a foam block. For longer storage, wrap them individually in clear cellophane bags and secure them with a ribbon, or arrange them in an airtight container lined with parchment to prevent sticking.
One of the perks of cake pops, however, is that you don’t have to make them right before a big event. Their small, bite-sized design makes them easy to freeze and store well in advance. Make sure your cake pops are fully dry, then place them in a freezer bag or other freezer-safe container and store them for up to six weeks. Just make sure you give them time to thaw overnight in the fridge before you’re ready to serve.

Make Your Masterpiece With Damask Cakes
Creating picture-perfect cake pops has never been easier. Check out the fun and delicious recipes at Damask Cakes and grab your baking kit to make this beautiful dessert for yourself.